

How To Repair Crack Porcelain Sink
In this quick guide, I provide simple step-by-pace instructions on how to prepare a cracked or chipped porcelain sink.
This method is guaranteed to piece of work, and I have the before-and-after pictures to show information technology.
Before I go into the detailed instructions, hither are the basic steps:
- Buy a porcelain repair kit designed specifically to prepare cracks in sinks, bathtubs, and tiles. My recommendation is the HomeTinker Porcelain Repair Kit .
- Prepare the area by gently sanding and cleaning with soap and water.
- Well-nigh repair kits come with two divide substances that actuate when mixed. Mix those substances for two minutes in a disposable cup or on a paper plate.
- If the resulting mixture doesn't match the colour of your sink, add dye according to the repair kit's instructions.
- Apply the mixture straight on the crack or chip with a popsicle stick, modest brush, or toothpick.
- Smooth the area with the plastic scraper that comes with the repair kit.
- Permit the mixture to solidify and the expanse to dry for 24 hours.
- Sand the repaired area until the excess material is gone. Echo these steps if necessary.
Although the steps are uncomplicated, knowing some of import details about the process will salvage yous time, frustration, and ensure yous'll exist satisfied with the result.
And then, if you're ready to go started, proceed reading.
Let's get into information technology!
Use the links below to quickly navigate the guide:
- Before and Afterward Pictures: What You Can Wait
- Step I: Choose the Correct Repair Kit
- Step 2: Set up the Area
- Stride Three: Mix the Resin
- Step 4: Add Tint to the Resin
- Step Five: Apply the Resin
- Step Six: Shine the Resin
- Stride 7: Allow the Resin to Dry
- Step Viii: Sand the Repaired Area
- Frequently Asked Questions
- How to Prevent Your Sink From Cracking and Chipping
Earlier and After Pictures: What You Can Expect
Before I get into the step-by-step instructions, I want to set your expectations with my before-and-after pictures.
After you lot complete this process, your sink volition look significantly better. In fact, information technology will be difficult to notice that there was ever an issue.
However, if you lot look from an inch away or with a magnifying glass, at that place will be show that the expanse was repaired. Also, if you lot rub your hand across the repaired surface area, you'll notice it'south not equally shine as the rest of the sink.
If that's a business concern, yous always have the option to supersede the sink. But, in this guide, I'm going to prove you lot how to conceal the repair as much equally possible, then you lot become the results you desire without having to spend hundreds of dollars on a new sink.
With that said, here is the "before" picture:

And, here is the "after" picture:

Step One: Choose the Right Repair Kit
The get-go footstep in the process is to purchase the right repair kit.
If you are not aware, at that place are several cheap kits available that are designed specifically for fixing cracked porcelain.
The kit I recommend is the HomeTinker Porcelain Repair Kit, which is available on Amazon and is one of the best-selling, highest-rated options.
The HomeTinker kit includes:
- Plastic gloves
- Ii types of sandpaper (coarse and fine-grit)
- Spreading tools (popsicle stick and toothpicks)
- Color-match gel dye
- Scraper
- Mixing resins (A and B)

This kit works on fiberglass, acrylic, ceramic, porcelain, gel-glaze enameled steel, and enameled cast iron, so it covers a wide range of scenarios.
It besides includes colour gel for ten different hues, assuasive yous to create a seamless repair that blends in with the original finish.
Tips:
- Although I use the HomeTinker kit , in that location are several other options to choose from on Amazon , Walmart.com , and HomeDepot.com .
- When choosing a kit, find 1 that'south environmentally-friendly and non-toxic.
- Ensure that the kit comes with the necessary gear for the task (gloves, sandpaper, spreader, scraper, dye, etc.)
- Ensure that the kit includes the correct dyes to match the color of your sink.
- Read reviews on Amazon . Although it's a simple production, some kits are much college-rated than others.
- Do non attempt to use substances that are non designed to repair porcelain, such as wall putty, spackling, or mucilage.
Step Ii: Prepare the Area
Before starting, ensure proper ventilation. Crack a window or plow on the bath fan.
Layout all components of the kit for easy admission and read through the instructions to make sure there are no special steps for the particular kit yous purchase.
To get gear up for the repair, gently sand the cracks and fries with a fine-grit sandpaper. Sanding will roughen the surface and allow the repair mixture to adhere fully.
Clean the target area with warm water, a non-abrasive sponge, and liquid soap such every bit Castile .

If y'all take soap scum to remove, use baking soda to add together some grit for scrubbing.
Later on cleaning, dry out the area thoroughly. Moisture, grit, or dirt will touch the results.
Tips:
- In improver to the kit, keep a paper plate or disposable plastic cup on hand for mixing and coloring the resin.
- Use painter'due south tape to seal off the target surface area subsequently the surface has been cleaned and stale.
- Continue damp newspaper towels nearby to keep the area clean and quickly wipe any spills or splatters before they dry.
- HomeTinker claims its product is odorless, merely that's non true. When I opened the packaging and unscrewed the lids, I got a strong whiff of unpleasant odor. The scent subsided once the resin dried, merely it was not even close to what I would consider odorless.
Footstep Three: Mix the Resin
Put on the plastic gloves.
On a dispensable paper plate or in a plastic cup, add equal parts of the A and B substances.
The amount depends on the size of the crack, but the ratio of A to B should exist 1:1.
Read the instructions for the specific kit you buy considering this ratio could vary slightly.
For small repairs, you lot won't need more than than a tablespoon each of A and B.
Use the popsicle stick to mix A and B until they're fully blended.

The resulting color will be Arctic White, which is a common sink colour. If you are performing a repair on an Arctic White surface, you can skip the next pace.
Tips:
- Mix parts A and B slowly for two minutes to go a good blend, moving the popsicle stick in various directions.
- In one case mixed, the resin is usable for thirty minutes. After xxx minutes, it will harden and become unusable.
- If your sink has a hairline (very thin) crack, you lot'll but demand a small corporeality of resin, then don't overdo it. Relieve some for future repairs.
- Place the resin containers on a paper towel while y'all mix to avoid getting any of the stickiness on your counter.
Step 4: Add Tint to the Resin
The color won't change when the resin dries, then if the color of your sink doesn't match the patently mixture, you need to add together the correct amount of dye.
The HomeTinker kit that I recommend contains two color match gel dyes. One is black, and the other has a golden-chocolate-brown hue.
To accomplish gray or black tones, use the black color gel. For brown tones, utilize the chocolate-brown color gel.
To achieve white, which is a shade darker than arctic white, add the tiniest amount of black color gel.

Tips:
- The HomeTinker kit comes with a guide showing the percentages of each dye needed to accomplish a specific color. For example, to achieve Milk White, add brownish dye so that the dye makes upwards .1% of the full mixture. To achieve the color Bone, add enough dark-brown dye so that the dye makes up two% of the total mixture.
- For best results, dip simply the extreme tip of a toothpick into the dye. Add together it to the white resin mixture and blend it in thoroughly before adding more than.
- If the colour isn't dark enough, add together another tiny drop of dye. If information technology's as well dark, add more parts A and B (as). It's much easier to add together more dye than to add together more mixture, and so go slowly and be precise.
Pace Five: Utilise the Resin
Carefully spread the resin onto the crack or chips using the supplied popsicle stick or a similar object. Push the resin gently so that information technology fills the crack.
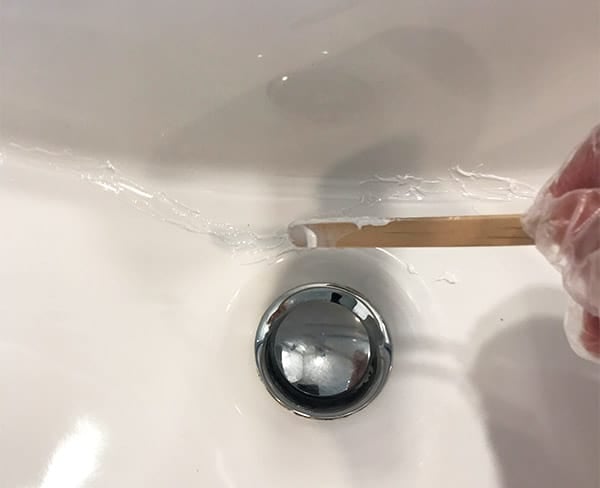
This step is one of the most important ones in the process. If you don't use enough resin, the cracks or chips will bear witness. But, if y'all use too much, it will be difficult to smooth the area and conceal the repair.
Tips:
- For hairline cracks, information technology will exist easier to employ the resin with a small paintbrush or the tip of a toothpick.
- Go irksome and utilise a lilliputian at a fourth dimension to avoid covering non-affected areas. It's okay for the resin to overlap the damaged area slightly, just you don't want to carelessly smear information technology all over the place because it will be a mess to make clean up later.
Pace Six: Smooth the Resin
Afterwards you employ the resin to the cleft or chip, smooth the resin with the scraper included in the kit.

If the kit your purchase doesn't include a scrapper, you can use any flat, flexible object, such as a playing bill of fare, small piece of cardboard, or a rubber spatula.
Cull an object that you don't mind disposing of afterwards considering the resin will be challenging to remove.
After you smooth the resin, wipe the backlog resin from the areas around the crack with a damp paper towel. Doing so will brand finishing the area (pace 8) much more manageable.

Tips:
- Utilize a down motion when applying the scraper to the resin and go in one direction.
- Don't scrape off likewise much resin. If you tin see the cleft'due south grain or an indentation where the fleck is, you've scraped likewise much. Go back, add more resin, and employ less pressure level when scrapping. It will take a few minutes of practice to get it right.
Step Vii: Allow the Resin to Dry
Let the repaired area sit for at least 24 hours to allow the resin to settle into the crevice and dry thoroughly.
If you follow steps i through half-dozen advisedly, there will be no need to apply an additional coat of resin.
But, if you make up one's mind to apply an additional coat for expert measure, disturbing the repaired area earlier 24 hours could mess up the hardening procedure and cause noticeable indentations.

Tips:
- The room should be dry, and your heat/Ac should be set at a normal temperature (68 to 72 degrees Fahrenheit).
- Turning on a fan to promote drying is unnecessary and won't speed up the process.
- If the sink yous're repairing is in a bathroom, avoid showering while the resin dries; the moisture from the steam could delay and interfere with the process.
- Necktie a plastic grocery bag effectually the faucet equally a reminder to not turn on the water.
Step Eight: Sand and Smooth the Repaired Area
Later the 24-hour drying menses is complete, gently blend and vitrify the repair into the original surface using sandpaper.

Sanding will get rid of any bumps and uneven spots, adding sheen and uniformity to the area.
Start with the coarse sandpaper to remove the more substantial portions of excess resin, then utilise the fine-grit sandpaper to end.
Tips:
- Sand gently in a clockwise motion.
- Don't press downwards also hard every bit you lot could scratch the porcelain, causing further damage.
- Check periodically for concluding results so that y'all don't over-sand the surface area.
- If the area still looks crude afterwards several minutes, continue sanding with the fine-dust sandpaper until you attain your desired smoothness. The process can accept upwards to 15 minutes.
- If the crack or chip is even so visible afterwards y'all've smoothed the surface, yous may need to echo the process and add more resin.
Frequently Asked Questions
Hopefully, the instructions I but shared are articulate. Simply, if you notwithstanding have questions, this section should aid.
Below are the most ofttimes asked questions about fixing cracks in porcelain sinks.
How long before the resin gets besides tacky?
After yous mix the resin, you have 30 minutes to tint and utilize it. If you take any longer, you will need to create a new batch.
What is the best style to get a perfect color friction match?
After yous've mixed your desired tint, place a few dabs on the agglutinative side of a strip of clear packing record. Hold the not-sticky side of the tape against the sink to encounter if it blends in. If it's besides light, add ane toothpick tip worth of dye at a time to the mixture until you achieve the perfect colour match. If information technology's also dark, add together more resin.
How long volition the repair last?
Information technology depends on which kit you employ and the quality of your work. The HomeTinker kit guarantees the repair for five years, only if yous utilise information technology correctly, the repair should last much longer.
Can I apply this epoxy resin over rust?
No. Remove the rust commencement with naval jelly or sand it lightly. You can also use a rust removal product rubber for porcelain.
Does the resin dry to a glossy or matte finish?
It dries to a glossy finish, simply don't wait the cease to match the original surface exactly. I've institute it to be slightly rougher and less slick than almost porcelain surfaces.
How long will this product final on the shelf after opening?
It volition final for 18 months. For best results, keep all containers sealed until yous're ready to use them.
How large of a scissure can this method repair?
The HomeTinker kit comes with two jars of resin that are 2 inches in diameter and 0.4 inches in acme. That'southward enough production to repair a sparse fissure of at least a couple of feet long, just if the cleft is wide and deep, information technology might not be plenty.
Put information technology this way; if the crack in your sink is and so large that you demand more than one kit, you probable need to supplant the sink.
How do I know if my sink is beyond repair?
In most cases, you can repair cracks and fries in your sink, no problem. Merely, if your sink is leaking due to structural cracks, it is time for a replacement. Also, if the crevice is so deep that yous tin can see through it, y'all need to consider ownership a new sink.
How much does it cost to replace a porcelain sink?
The toll of replacing a porcelain sink depends on several factors, including the size and style of sink, and local labor costs.
According to HomeAdvisor.com, the full price of labor can range from $211 to $558. Add that to the average cost of a porcelain bathroom sink ($thirty to $300 on HomeDepot.com) or kitchen sink ($150 to $500 on HomeDepot.com).
What is the best repair kit for a cracked sink?
The HomeTinker Repair Kit is one of the top-selling kits on Amazon; information technology's the ane I use and recommend. Another 1 on Amazon that customers honey is the Waterfresh Repair Kit.
What causes a porcelain sink to crack?
In general, porcelain sinks are durable, just certain situations can atomic number 82 to cracks and chips. Cracks often occur when y'all betrayal the porcelain to extreme temperature changes. For example, pouring boiling h2o into a sink that's common cold to the touch tin cause thermal shock, which results in cracking.
Other common causes include dropping a heavy item on the sink, nearby vibrations, continually leaning on a sink in the same spot, and ordinary wear over time.
How to Forbid Your Sink From Cracking and Chipping
Although the process of fixing a cracked porcelain sink is relatively straightforward, it's not a project you desire to do more than one time.
So, how can you prevent cracks and chips from happening in the future?
Here are a handful of tips:
- Avoid extreme temperature fluctuations. If yous've been running hot water in your sink, abruptly switching to common cold volition shock the surface area and could cause a stress crack.
- Similarly, if your drain is clogged, use Drain-O or a comparable product. Don't cascade humid h2o downwardly the bleed every bit the spill-over could crusade unnecessary stress on the porcelain and lead to cracks.
- Avoid leaning on your sink as the repeated force per unit area could lead to cracks over time.
- Keep the lather dispenser, hairdryer, and any other heavy objects a condom distance away from your sink.
- Stuffing the space under your sink could cause unnecessary pressure on plumbing and cause a crack over time.
- If yous are remodeling or moving heavy items, put a protective barrier such as thick cloth effectually your sink to protect it from bumps and scratches.
Sometimes a crack or chip is unavoidable. Merely, by being careful around your sink and using common sense, yous can minimize the chance of it happening.
If you lot've used my recommended kit or a similar epoxy resin kit to fix a cracked porcelain sink, what was your experience? Were you satisfied with the issue?
Annotate beneath and let me know!
If y'all plant this guide helpful, y'all should also check out:
- How to Make a Shower Floor Less Slippery: iv Unproblematic Methods
- The Ultimate Domicile Maintenance Checklist (Printable)
- How to Brand Tile Floor Less Slippery: vi Methods
- How to Remove Candle Wax From Woods (four Easy Methods)
- The Ultimate Business firm Cleaning Checklist (Printable)
- How to Set up a Weak Flushing Toilet (eight Simple Solutions)
- Boilerplate Cast Iron Bathtub Weight (With 15 Examples)
- How Long Does Grout Take to Dry? (With Real Examples)
- How Long Does Primer Take to Dry? (With 20 Examples)

How To Repair Crack Porcelain Sink,
Source: https://prudentreviews.com/cracked-porcelain-sink/
Posted by: washingtonnoremorkes.blogspot.com
0 Response to "How To Repair Crack Porcelain Sink"
Post a Comment